I wanted to make something new for my newly decorated lounge so I made these using some bric a brac that was left to me by my Father. I am not sure where he acquired it from but I think they are quite old so wanted to make a feature of it. The Cricut images are from Home Decor Cart and were cut at 1.5inches cut on Gold & Brown 12x12 inch cardstock from Papermania Textured Christmas Stock and I covered a 20cm square canvas with papers from K&Company.
Wednesday, 25 May 2011
Tuesday, 17 May 2011
Step card plastic template
Just thought I would share with you my step card template. Using the measurements on my previous post I marked out the details on the plastic sheet and snipped out a triangle where the score or cut will start. Then all you have to do is line it up on your base card and put a tiny dot by the cut out and that is where you need to score or cut.
This is the page with all my instructions on. It makes step cards so very easy.
I have also done a step card on the other size for A5 size card.
The plastic is just the cover from a cheep folder I picked up from WHSmith.
Thanks for looking.
Monday, 16 May 2011
Birthday Card using Nursery Tails
When I first saw this cartridge I thought I would never use it as my boys are way beyond the age for these cutesy images but I think it is proving to be a very adaptable one. This card is for my friend who has got a significant birthday and catching up with me!!
The base card is from WHSmith A4 size, 21cm x 29.5cm.
The step card instructions are as follows:-
Place your card on your work surface with the short sides at the top and bottom.
Measure and mark 5cm, 8.5cm, 14.5cm, 20.5cm and 24cm down the right edge. Score 11.5cm horizontal lines from each mark. Score alll the way across at the 14.5cm mark.
Draw a pencil line from the left edge of the top score line down to the left edge of the bottom score line. Use a craft knife or similar and cut along the pencil line.
Mountain fold the 5cm, 14.5cm (all the way across), and the 24cm score line. Valley fold the 8.5cm and 20.5cm score lines to complete the step design.
I also made a template using an A4 size bit of plastic so that I dont have to measure to make this sort of card again. I am not good at measurements, so the less I have to do the better.
The main image is cut at 5inches (13cm approx) all placed on
using pop dots from Lidls to give dimension.
The first mats are from my stash. Cant remember where I got them from. Think my friend gave me the one with Friends on. Then the Party on label is from JT Cart and is on a Tim Holtz die cut.
Hope you like it. Thanks for looking.
Monday, 9 May 2011
Stained Glass Door
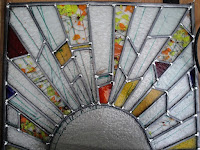
My eldest son started University last September and the day before he had a cafuffle with his younger brother. Somehow between them a panel in the door broke all over his brother and of couse it was non of their faults. Luckily there wasn't any serious injuries but I ended up with a window to fix. Any way after we had all calmed down and when I came back from taking my son to University, (a proud moment and sad one as he would be staying in residence) I thought it was a good opportunity to make a stained glass panel. So this is the result.....
Work in progress on the left and after the soldering was complete on the right.
All made using the traditional stained glass method with lead came.
Work in progress on the left and after the soldering was complete on the right.
Panel complete before I fitted it into the door. Just wish I had more time to do this. I love it.
Tuesday, 3 May 2011
Hello Kitty Card I go all pink and girly!!!
Well I have a chance of doing a girly card, which is not that often with two boys myself and mostly boys in the family so I take every chance I get. It is a friend of my son and she is a fan of Hello Kitty and as I have both Cricut cartridges I thought its got to be done.
I used A4 paper folded in half for the card base from The Paper Mill shop,
Lovely yellow and pink flowered paper from DCWV "The Glitter Sweet Stack" with pink matted on top then I wrapped a spotty pink ribbon from Create and Craft round it, just gluing down the ends and tied another piece at the top as shown to make it look like a bow, I centred Little Kitty on the pink matt and made the Happy birthday image from page 38 using black base, light blue and dark blue from Papermania cut at 3 inches (7.6cm)
I am using the images from Hello Kitty Greetings cartridge from page 34. All sizes were done at 5.5 inches, (14cm). The first image was the main one cut in black, this has all the score lines on and it helps with the placing of the other cuts.
I used A4 paper folded in half for the card base from The Paper Mill shop,
Lovely yellow and pink flowered paper from DCWV "The Glitter Sweet Stack" with pink matted on top then I wrapped a spotty pink ribbon from Create and Craft round it, just gluing down the ends and tied another piece at the top as shown to make it look like a bow, I centred Little Kitty on the pink matt and made the Happy birthday image from page 38 using black base, light blue and dark blue from Papermania cut at 3 inches (7.6cm)
Then press the white&fur/bow&nose button and cut in white
Then its the same button again but press the shift and cut in pink
and lastly press the Clothes/Clothes button for the bear, I used cream.
They all fit together using the black base I put them all in place as follows:-
I also did a few variations and some decoupage. Once I started I couldnt stop!! They all came out so cute, this is the first time I have really understood how to layer them so I just wanted to share it. Hope you all understood.
I also did a strawberry inside my card and used one of the Papermania springs to get it to bounce.
This was all cut at 3inches (7.6cm) using the relative size button. Black base is the main button then clothes/clothes button using red for the berry and same button with shift for the green stalk. Put all together on the base using the score lines for spacing.
Monday, 2 May 2011
Congratulations Card for the Royal Wedding
My son had to design a card for the Royal Wedding. Then the best would be chosen by his class and possibly go on to represent his school and be sent to the happy couple. He had a clear idea of what he wanted and we found a lovely image of some swans on the internet, cant remember which site now I am afraid, sorry. he cut it out and I helped him with the layout and cutting out the words on my Cricut.
His card was chosen by his class then his year and it came 2nd over all. So we were all very proud and impressed with his acheivements.
Subscribe to:
Comments (Atom)
My Sons card for the Royal Wedding

He won 2nd prize and it has been sent of to the happy couple. Very proud and he made a gorgeous card. I thought it was the best.


